Earl Grey Truffles with Orange & Lavender

Wednesday, February 10th, 2016 by

truffles

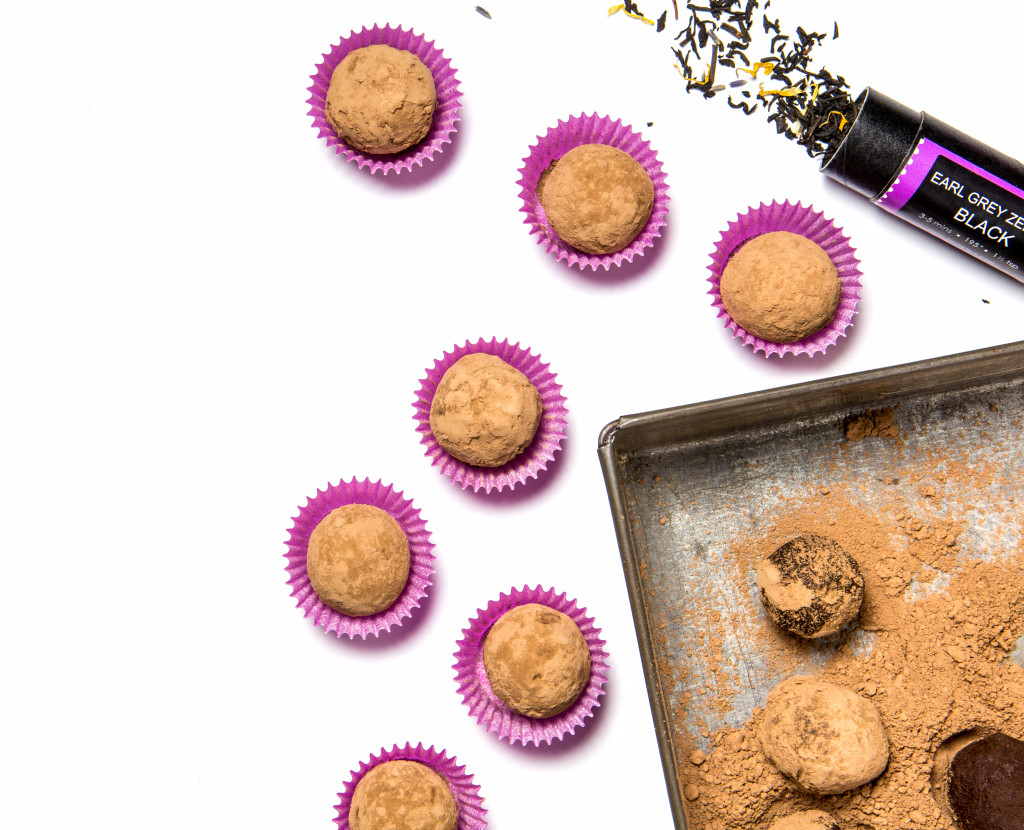
Homemade valentines might bring doilies and glue sticks to mind, but this classy upgrade is almost as easy as the elementary school version. Chocolate truffles are essentially ganache nuggets dusted with cocoa powder. Ganache is incredibly easy to make and dangerous to have in the fridge. This recipe makes a dozen (good sized) truffles, but you might want to double it in case you find yourself “testing” that ganache more than a few times as it cools. We used just enough of our Earl Grey Zephyr loose leaf tea, featuring real oil of bergamot, orange peel, and lavender, to subtly flavor the chocolate. Use more tea to further emphasize the flavor, or try it with our Lady Earl White or Royal Earl Grey Chai.

Ingredients

  • 2/3 cup heavy cream
  • 2 tablespoons unsalted butter, room temperature
  • 2 teaspoons Earl Grey Zephyr loose leaf tea
  • 6 oz. fine-quality dark chocolate (we used 70% cacao)
  • 1 cup unsweetened cocoa powder

Directions

Bring cream and butter to a boil in a saucepan and remove from heat. Stir in tea leaves and let steep 5 minutes. While the tea is steeping, finely grind chocolate in a food processor and transfer to a bowl. Pour the cream mixture through a fine-mesh sieve onto the chocolate, discarding the tea leaves. Whisk until smooth. Cover and chill in the refrigerator at least 2 hours.

To shape the truffles, spoon even scoops of ganache onto a baking sheet. A melon baller or ice cream scoop can help create rounded, even scoops. Make sure your hands are cold (running them under cold water or holding a piece of ice first helps). Dry and roll each piece of ganache into a ball. Keep the rolling to a minimum to prevent the chocolate from softening. They don’t have to be perfectly round; after all, they’re homemade! Drop several balls at a time into bowl of cocoa powder and turn to coat. Transfer to an airtight container, separating layers with wax paper. Store for up to two weeks in the fridge, dusting lightly with more cocoa before serving if needed.


Matcha Cheesecake Recipe

Friday, January 29th, 2016 by


Matcha Cheesecake Slices

This delicious cheesecake was made by Lori, our multitalented shipping manager, using our Matcha green tea powder. Matcha is known and loved for its robust, slightly sweet flavor and gorgeous green color. Just a few teaspoons transform this traditional cheesecake recipe into something truly impressive. The chocolate crushed cookie crust is optional, but adds texture and a great color contrast.

Ingredients

1 1/2 lb cream cheese softened at room temperature

14-oz can sweetened condensed milk

4 large egg yolks 1 cup sour cream

1 tablespoon confectioners sugar

1 teaspoon vanilla

1 teaspoon lime zest (optional)

5 teaspoons matcha powder (plus more for dusting)

For the crust:

24 chocolate cookies-finely crushed

1/4 cup unsalted butter-melted

Directions

Preheat oven to 350 degrees F. Grease a 10-inch springform pan and set aside. Finely crush the cookies in a food processor. Add melted butter and blend until it’s all moistened. Press crumb mixture onto the bottom of the prepared pan and bake for 8 minutes. Remove from the oven and set on a wire rack to cool. Reduce the oven temperature to 275 degrees and begin making the filling. Beat together the cream cheese and sweetened condensed milk. While beating, add the egg yolks one at a time and beat until very smooth. Add the sour cream, Confectioners sugar, vanilla, lime zest, and matcha. In a separate bowl, beat 4 egg whites with 1/2 t salt until stiff. Fold into the cheese mixture. Pour batter into a 10-inch springform pan lined with the crust. Bake at 275 degrees for 1 hour. Turn off the heat and let sit (door closed) for 45 minutes or more. The cake should cool completely in the oven. Run a knife around the inside of the pan and store in the refrigerator uncovered for the first few hours to prevent condensation. Remove from the pan when cold.

To serve, make sure the cake is dry and dust the top with matcha powder using a fine mesh sieve. Slice the cake while still cold using a thin, non-serrated knife and rinse the blade under hot water between slices. Another great slicing method: use a piece of dental floss, fishing line, or thin wire to cut through the cake. Drop one end at the bottom after each cut and pull it through!


How to Make Turkish Coffee (and Possibly Predict the Future)

Friday, January 22nd, 2016 by

Turkish

Turkish coffee is a strong, sometimes spiced coffee served with a little foam served in a demitasse or espresso cup. Meant to be savored slowly, not downed like an espresso shot, Turkish style brewing is an unfiltered stovetop method producing a very flavorful, caffeinated cup. The Internet is full of conflicting (and sometimes complicated) advice on the proper technique. This is our favorite method.

Ingredients (for two servings):

  • 2 tablespoons finely ground coffee. Turkish is a grind level you can request when placing your order. If you’re grinding beans at home, you want a finer grind than espresso. The coffee should be a fine powder. Most supermarkets also have grinders with a Turkish setting. A City or French roast works best.
  • Cardamom, cinnamon, cloves, or anise. Spices are optional. Add a pinch of whichever ground spice you choose. We add two whole cardamom pods to the pot while brewing.
  • 2 teaspoons sugar. Sugar is also optional, and Turkish coffee is delicious with or without it.
  • 6 ounces cold water. Cold water lengthens the brewing time, which produces a more flavorful cup.

Method

Brewing Turkish coffee should only take a few minutes. The key is to keep a close eye on your pot the entire time, never letting the coffee fully boil. First, add all the ingredients to a Turkish coffee pot or small saucepan. The coffee will float on the top until it heats up, and then start to sink a little. Stir the mixture a few times and continue to heat until simmering.

When you see the coffee start to rise and foam begins to form at the top, lift the pot off the burner and stir. At this point, you can spoon some foam into your serving cups if you like. Return the pot to burner and continue to heat until the rising/foaming starts again. Remove the pot from the burner. Spoon more foam into your cups. Then pour the remaining coffee slowly to keep some of the sunken grounds in the pot. Allow the cups to sit for a minute so the grounds can settle, and enjoy!

If you would like to try your hand at fortune telling, leave a sip at the bottom, and follow these instructions to divining the future from the grounds!

The Procession Cocktail Recipe

Friday, October 23rd, 2015 by

Tea parties a are a little creepy, don’t you think? Halloween is a great occasion to host one, Mad Hatter style. Even without the tea party, this is the perfect cocktail to creep your guests out in a big way. We started with the basic recipe for a hibiscus tea cocktail called The Procession and upped the goulish factor a little with some hibiscus syrup and dry ice.

layers2

Ingredients (for the drink)
½ oz silver tequila
¾ oz crème de cacao (white)
½ oz ruby port
¾ oz hibiscus tea, chilled (make 1 cup more for the syrup, if using, below)
2 dashes of orange bitters

For the hibiscus syrup:
Bring 1 cup of brewed and strained hibiscus tea to a boil (2 teaspoons brewed for 5 minutes made a nice strong cup). While the tea is boiling, add a cup of sugar and stir constantly for about two minutes. Remove from heat and let cool.

Shake the cocktail ingredients together with ice and strain into a cocktail glass. Add a small chunk of dry ice (check out these instructions on handling dry ice) to the glass, and drizzle a little hibiscus “blood” along the rim. Serve immediately. The bubbling lasts for about five minutes.

Created by Daniel Hyatt, The Alembic, San Francisco. Original recipe here.

Espresso Shortbread Cookies

Thursday, October 15th, 2015 by


Iced Shortbread Cookies

Holiday season is almost upon us, which means cookies in the break room again. Shortbread is a favorite because you can make many variations with one big batch of dough. If you have a tried-and-true shortbread dough you love, you can easily adapt it by mixing ground coffee into the dough and glazing the cookies with coffee icing (recipe below).

We followed this recipe, for the shortbread dough, with a couple of changes: we used our 0 Dark 30 blend coffee, ground for a standard autodrip machine, and two kinds of icing to mix things up a little.

Ingredients (yield: about two dozen cookies)

For the dough
1 cup unsalted butter, room temperature
1 cup powdered sugar
1 Tablespoon ground 0 Dark 30 (or any dark roast coffee you like)
½ vanilla bean, split and scraped for seeds
½ teaspoon kosher salt
2 cup flour, sifted

For the icing
1 cup powdered sugar
2 Tablespoons half and half (or strong brewed coffee, cooled)

You can find the full directions for the dough here. Mix the icing ingredients together until smooth and glaze the cookies once they have cooled completely. Then bring them to work so you don’t eat them all by yourself.