Chocolate Lover’s Coffee Shake

Wednesday, August 23rd, 2017 by

Have you noticed the monstrously huge milkshakes all over Instagram that seem to explode out of their glass? Either you find them a little much or you accept the challenge and dive in as we have. Have fun with the recipe and add whatever you like, but please read the tips section and learn from our (messy) mistakes!

Ingredients

For the milkshake:

1 cup strong coffee, chilled (we used French Roast)

4 large scoops chocolate ice cream

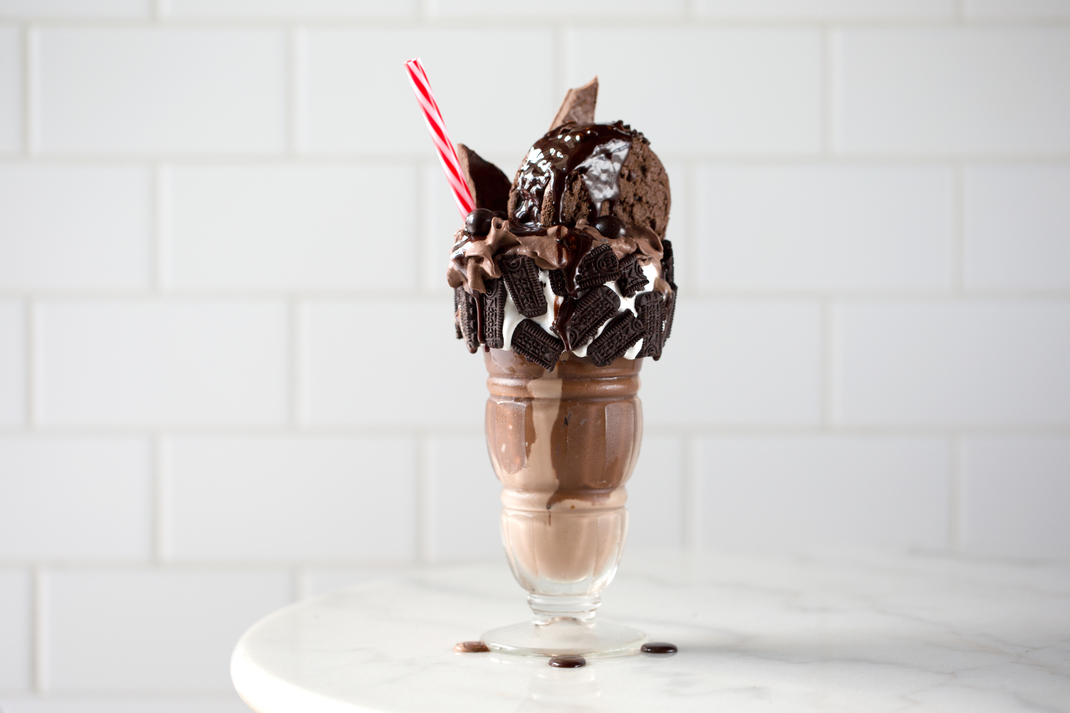
Toppings (as pictured):

Chocolate Fudge

Marshmallow creme

Cookie pieces

Chocolate whipped cream

Chocolate covered espresso beans

1 ice cream sandwich

1 chocolate bar broken into pieces

Instructions

To create a swirl effect, use a knife to spread some fudge on the inside of the glass. Next spread a band of the marshmallow creme around the outside at the top. Stick on cookie pieces, candy, or sprinkles. Keep it light here, or things will slide! Then pour your milkshake into the glass, leaving some room at the top, followed by whipped cream. Add your straw and pile on whatever you like; we added a chocolate bar, chocolate covered espresso beans, and an ice cream sandwich. We’ve seen doughnuts, cake slices, marshmallows on a stick, etc. The sky is the limit (if you work very quickly).

*TIPS*

Once the outside of the glass has been decorated, stick it in the freezer until you are ready to add the shake. About ten minutes should do the trick. If you’re adding especially heavy candy or cookies to the outside, keep the rim of the glass clean and turn it upside down on a baking sheet to keep things from relocating themselves before they firm up in the freezer.

Make sure your shake is super thick! Add more ice cream if necessary.

Leave a half-inch or so of room at the top when pouring the shake. Otherwise it might overflow when you add your heavier toppings.

Serve with a spoon, and maybe a fork and knife as well. The straw is mainly decoration.

On a hot day, things will start to slump quickly, so dive in immediately!

Rum & Lemon Ginger Green Tea

Thursday, August 10th, 2017 by

Last year, we celebrated National Rum Day with a spiced rum and coffee cocktail called the Dark Moon. We’re giving tea lovers something to toast with this year: a twist on the traditional dark and stormy cocktail made with our Lemon Ginger Green Tea. For ours, we chose Fever Tree ginger beer, which packs a giant wallop of ginger flavor and compliments the tea nicely without tasting watered-down.

Ingredients (per drink)

4 oz ginger beer
2 oz cold Lemon Ginger Green Tea
3 oz black strap rum
Splash of simple syrup or to taste

Instructions

Allow the tea to cool, or brew it right before serving by replacing half the brewing water with ice. Combine the tea and ginger beer over ice and sweeten with simple syrup to taste. To float the rum on top, pour slowly over the back of a spoon. Garnish with a slice of lemon and some candied ginger if you want to get fancy. Stir and enjoy!

The Coolest Coffee & Tea Recipes for Summer

Wednesday, June 21st, 2017 by

When the days are extra long, caffeination is so very important. In honor of today’s solstice, we thought we’d round-up our very favorite summer coffee and tea recipes.

For Coffee Lovers:

No-Churn Coffee Fudge Ice Cream

Vietnamese Coffee Popsicles

Dark Moon Cocktail

Cold Fashioned Cocktail

Affogato

For Tea Fans:

Iced Chai Bubble Tea

Watermelon Mimosa Green Tea Popsicles

Homemade Kombucha

Jasmine Honey Tea Granita

Tea Sangria

The Ultimate Coffee Lover’s Cheesecake

Wednesday, November 16th, 2016 by

1s0a9879

If you like to sink your teeth into a good baking project on a cold day, this one is worth the effort. As pretty as it is delicious, it’s also the perfect dessert for a holiday dinner or special occasion. Consider it the dessert version of an after dinner coffee drink, a drink with a cinnamon-coffee layer, a chocolate-coffee layer, cream cheese frosting, and a chocolate cookie crust!

1s0a9914

Ingredients

For the cheesecake:

1 1/2 lb cream cheese softened at room temperature

14-oz can sweetened condensed milk

4 large egg yolks

1 cup sour cream

1 tablespoon confectioners sugar

1 teaspoon vanilla

4 ounces dark chocolate, melted (we used the 70% cocoa variety)

4 tablespoons turkish or extra fine ground coffee, divided between layers

4 tablespoons coffee liqueur, divided between layers

2 tablespoons cinnamon

For the crust:

24 chocolate cookies-finely crushed

1/4 cup unsalted butter-melted

2 tablespoons turkish or extra fine ground coffee

For the topping:

1 lb cream cheese softened at room temperature

1 cup sour cream

1/2 cup confectioners sugar

Dark chocolate shavings

Directions

Preheat oven to 350 degrees F. Grease a 10-inch springform pan and set aside. Finely crush the cookies in a food processor. Add the coffee and then the melted butter and blend until it’s all moistened. Press crumb mixture onto the bottom of the prepared pan and bake for 8 minutes. Remove from the oven and set on a wire rack to cool. Reduce the oven temperature to 275 degrees and begin making the filling layers. Beat together the cream cheese and sweetened condensed milk. While beating, add the egg yolks one at a time and beat until very smooth. Add the sour cream, confectioners sugar, and vanilla. In a separate bowl, beat 4 egg whites with 1/2 t salt until stiff. Fold into the cheese mixture.

To create the layers, divide this mixture in half. For the bottom (chocolate) half, whisk in 2 tablespoons of the coffee, 2 tablespoons of the coffee liqueur, and the 4 ounces of dark chocolate. For the top (cinnamon) layer, whisk in the remaining 2 tablespoons of coffee, 2 tablespoons of coffee liqueur, and 2 tablespoons of cinnamon. Pour the chocolate batter into the 10-inch springform pan lined with the crust, followed by the cinnamon batter. Bake at 275 degrees for 1 hour. Turn off the heat and let sit (door closed) for 45 minutes or more. The cake should cool completely in the oven.

Meanwhile, beat together the first three topping ingredients and let sit at room temperature. When the cake is cool, remove from the oven, spread the cream cheese mixture over the top, and add the chocolate shavings. Run a knife around the inside of the pan and store in the refrigerator uncovered for the first few hours to prevent condensation. Remove from the pan when cold.

To serve, slice the cake while still cold using a thin, non-serrated knife and rinse the blade under hot water between slices. Another great slicing method: use a piece of dental floss, fishing line, or thin wire to cut through the cake. Drop one end at the bottom after each cut and pull it through!

Flash Brewed Iced Coffee

Thursday, September 8th, 2016 by

Flash Brew

If you’re one of the many iced coffee lovers who’ve made the switch to cold brew, you may be wondering what all the fuss is about “flash brewed” iced coffee. Back before cold brew was a thing, iced coffee was often regular strength hot coffee (or yesterday’s coffee) poured over ice. The result was watery and disappointing. Also called ice brewed or Japanese-style iced coffee, flash brewed iced coffee is brewed fresh over ice, usually using a pour-over brewer like the Chemex or Hario. For a visual, check out our video on brewing hot or iced coffee with the Chemex. It can also be made with a regular old automatic drip machine or an Aeropress. The key is allowing the coffee to drip directly onto the ice as it brews. Drip by drip, it cools instantly and less dilution occurs than if you were to dump a cup or a pot full of hot coffee over ice.

Flash brew vs. cold brew

If cold brew tastes a little flat to you, that’s because ground coffee requires heat to release some of its acids and aromatic oils (for details on the cold brewing method, check out our post). Cold brewed coffee is much less acidic, but possibly also less nuanced in flavor. High temperatures also cause these oils to oxidize and degrade over time, resulting in the sour or stale taste coffee acquires after sitting on a burner too long. Both methods claim to minimize oxidation, cold brewing by omitting heat and flash brewing by minimizing the amount of time between exposure to heat and consumption.

Another important difference between cold brew and flash brew is texture. Cold brew is less filtered since the coffee sits in contact with the grounds for a long period and some finer sediment dissolves over time. The end result is a rich, mellow cup, with the velvety texture of French press coffee. Flash brewed coffee by comparison is cleaner and crisper, with more bite, more aroma, and some would argue, more flavor.

Flash brewed coffee also has a few convenient advantages over cold brews, depending on your perspective. While nothing is lazier than dumping grounds and water in a bowl and letting them sit, flash brewed coffee is ready right away – no wait required. Also, less coffee is required since cold brew recipes typically make a concentrate with a high ratio of grounds to water. For flash brewing, start with the amount of coffee you would normally use, and replace half the brewing water with ice. Increase the grounds to water ratio if you like a little stronger taste from your iced coffee.

So which one wins? Cold brewing will emphasize more chocolaty or nutty characteristics while the acidity of flash brew will taste fruitier. Try picking a single origin coffee with an acidity level and flavor notes that will either play up or balance these characteristics. For instance, the higher acidity level of Ethiopian Yirgacheffe really jazzes up a cup of cold brew. To further emphasize its brightness, try it flash brewed. To minimize the acidic flavor of flash brewed coffee, try an Indonesian varietal like Papua New Guinea or Estate Java. Flash Brewed coffee tends to have a more nuanced flavor, perfect for a light roast coffee, but there are no rules. Experiment with roast level, see what you like, and share your recommendations!